All of the Q-bus based VAXen have a console bulkhead that provides a connection for the "console" serial device and indicates some diagnostic state. This is the ultimate minimization of what was once a grand and glorious bank of blinking lights and toggle switches.
One important thing to consider is that the "console monitor" which is a significant program in its own right started simply in the MicroVAX II and has become progressively more complex. Typically a serial console is a VTxxx terminal running at 9600 baud, 8 data bits, and one stop bit. With some of the later models running at 19200 or 38400 is even nicer, but you get to a point where the terminal can't keep up!
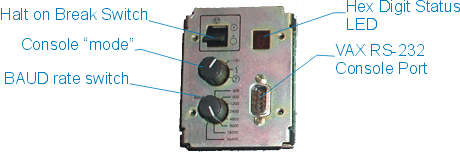
The MicroVAX II and machines mounted in BA23 and BA123 cabinets will have a control panel like the one shown above. There is a paddle switch on the top left that controls how the VAX responds to the 'break' key from the terminal. If it is "down" (toward the dot-outside-the-circle glyph) then the VAX will halt and enter the console monitor whenever the operator presses BREAK on the keyboard. Since the interrupt this causes is asserted in hardware it nearly always works. When it doesn't your VAX is really wedged tight. This is the equivalent to CTRL-ALT-DEL on a PC except that you can type 'C' (continue) on the VAX and return to where you were.
The 9 pin serial port is not the same as a PC serial port. What this means is that you can't use a simple 9 pin to 9 pin cable to connect your PC to your VAX. The 25 to 9 pin "PC to printer" cable is pretty close and I've used that successfully, but by far the easiest thing to do is to get two DE-9 hoods that have an RJ-45 connector in the back, wire one straight through and the other match up the pins to the PC's pins. Then connect the two with a piece of CAT5 patch cable and you're on the air.
Kees Stravers did the best description for making a serial cable that I've seen yet. It was sent to the Classic Computer Mailing list:
VAX 9 pin console          PC 9 pin serial        PC 25 pin serial
   1 - Shield GND             2 - Received data      1 - Shield ground
   2 - Transmitted data       3 - Transmitted data   2 - Transmitted data
   3 - Received data          5 - Signal GND         3 - Received data
   7 - Signal GND             1 - DCD                7 - Signal GND
   8 - sense console 1        4 - DTR                8 - DCD
   9 - sense console 2        6 - DSR               20 - DTR
                              7 - RTS                6 - DSR
                              8 - CTS                4 - RTS
                                                     5 - CTS
The Cable

  VAX         PC9 PC25
  2 ---------  2   3

  3 ---------  3   2

  7 ---------  5   7

  8 -+     +-  1   8
     |     |
  9 -+     +-  4  20
           |
           +-  6   6

           +-  7   4
           |
           +-  8   5
|
 Several
types of machines in the BA213, BA215, and BA440
cabinets support this type of console panel. Unlike the MicroVAX II panel above,
this one uses the DEC-423 (RS-423 differential signaling) type console port that
uses an MMJ connector. The good thing about DEC-423 is that it can go 1000' and
run at 9600 baud, the bad thing is that funky connector. If you are going to be
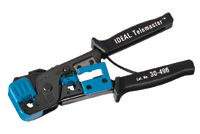
working with a lot of VAXen I suggest you get the Telemaster
Crimp Tool #30-497 from Ideal
Industries as this thing will crimp on both RJ45 and MMJ connectors. Using
it you can make an RJ45 to MMJ cable that you can then put into one of those
DB-9 hoods with the RJ45 in the back. A lot easier than tracking down the DEC
adapters.
Several
types of machines in the BA213, BA215, and BA440
cabinets support this type of console panel. Unlike the MicroVAX II panel above,
this one uses the DEC-423 (RS-423 differential signaling) type console port that
uses an MMJ connector. The good thing about DEC-423 is that it can go 1000' and
run at 9600 baud, the bad thing is that funky connector. If you are going to be
working with a lot of VAXen I suggest you get the Telemaster
Crimp Tool #30-497 from Ideal
Industries as this thing will crimp on both RJ45 and MMJ connectors. Using
it you can make an RJ45 to MMJ cable that you can then put into one of those
DB-9 hoods with the RJ45 in the back. A lot easier than tracking down the DEC
adapters.
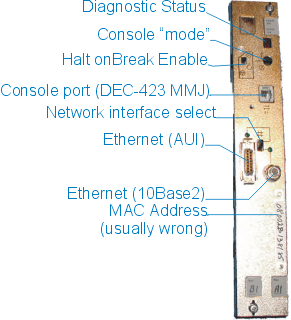
The other thing of note is that this panel includes the Ethernet connection. There is a switch that selects 10Base2 or AUI as the port to use (an LED will light up over the selected port). The problem is that this switch gets dirty and when it does the Ethernet port can act up in weird ways (sending but not receiving packets for example!)
Like the other panels this one has a console "mode" switch that selects one of three modes, language selection (icon looks like profile of a face), normal (arrow icon), or loop test (T with an arrow going around it in a circle). This panel is also used on the DECSystem machines but it has a different connector on the back in that case. The halt on break switch is quite small and easy to miss if you aren't careful. If this is in the "don't halt" (ie dot in the circle) position then the VAX will automatically boot, unless it hasn't had a default boot device set at which point it will boot from the network.
There is a small HEX digit LED that is somewhat less useful on the later model VAXen since the number of tests increased dramatically on the KA640 and beyond. The "biggies" that you need to look out for are 'F' which is a general everything is F**ked code, E which I've found often means there isn't any memory (or it isn't responding) and 3 which is the state it sits in when it is waiting to boot. If you power up a VAX with no console and the display successfully counts down to 3 then it is probably OK. When you actually boot the display counts all the way down to 0.
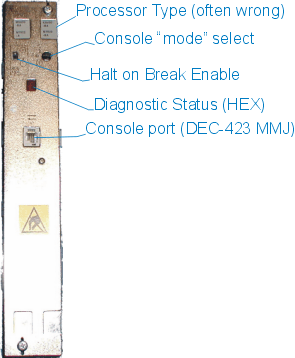 These
machines use the panel shown on the left as their console bulkhead. The most
interesting thing to note is that it does not have an Ethernet port built
in. On the 3500/3600 (which use the KA650) and the 3800/3900 (which use the
KA655) the Ethernet and disk controller are provided on separate boards so they
get their own bulkheads. Like the KA640 bulkhead there is a place to put a
sticker identifying the CPU card in the system, I've found that about 50% of the
time the customer has upgraded the system at some point so this sticker is
wrong. (Or perhaps they replaced a bulkhead)
These
machines use the panel shown on the left as their console bulkhead. The most
interesting thing to note is that it does not have an Ethernet port built
in. On the 3500/3600 (which use the KA650) and the 3800/3900 (which use the
KA655) the Ethernet and disk controller are provided on separate boards so they
get their own bulkheads. Like the KA640 bulkhead there is a place to put a
sticker identifying the CPU card in the system, I've found that about 50% of the
time the customer has upgraded the system at some point so this sticker is
wrong. (Or perhaps they replaced a bulkhead)
This console panel works with the KA630 (Yes the MicroVAX II!), KA650 (MIcroVAX III and MV3500), and KA655 (MV3800/3900) CPU modules. It has two ribbon cables to connect to the two ports these CPUs expect to be connected.
When installed in a BA213, BA215, or BA440 cabinet this panel will "cover" two slots, the one on the right is the CPU module and the next slot to the left is expected to be the memory module. When you have more than one memory module its covered by a blank slot cover.
This panel has all of the now familiar controls, console mode, halt on break, etc. However, on this panel and on the KA640 panel, the baud rate setting is done using a rotary switch on the back of the panel. What that means is that you can't change the rate when the panel is on the machine, you have to turn the two captive screws on the top and bottom and pull the panel out to switch rates. In practice this isn't a big deal
 .
.
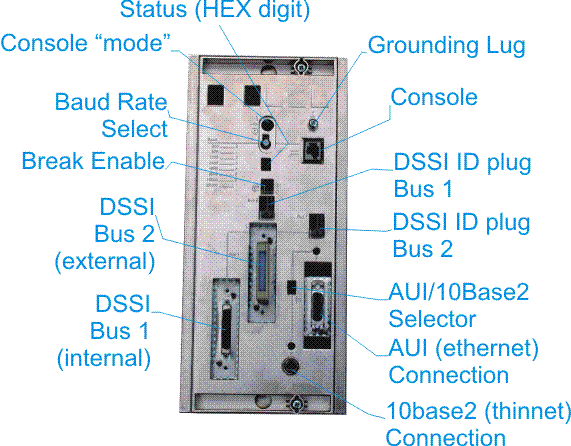
The VAX 4000 panels in the BA440 get a bit complicated in the model 300 and above. This is in part because they also serve as the "door" to the CPU Box. There are two DSSI channels that are available from the front labeled Bus 1 and Bus 2. Bus 1 actually connects to the backplane of peripherals in the top of the BA440 so drives and tapes plugged in up on top appear on this bus. Bus 2 is available for expansion, or for clustering with another VAX. Another useful difference is that unlike the MicroVAX 3300/3400 panel above the baud rate adjustment is once again on the outside so you can change it without removing or opening the panel.
A special note on the DSSI ID plugs. These plugs set the Node number for the CPU on the bus. Thus if you are connecting two CPUs together with DSSI then they should have different node numbers on this bus.
So what do those little glyphs on the control panels mean? Well here in a table form is the complete definition:
| Glyph | Meaning |
| Auto-boot (disable halt on break) | |
| enable halt-on-break, do not auto-boot | |
| Identifies console break enable switch | |
| Console Mode: Normal | |
| Console Mode: Loop Test | |
| Console Mode: Language Select |
Copyright (c) 2000, Chuck McManis, All Rights Reserved
NOTE: All images on this site are COPYRIGHT © 2000, 2001 by Charles McManis, you may not use them without written permission from me! (Especially EBAY Auctions!) You may put a link to this site with a note that your system is "like" one of mine but you cannot use the images. Thank you.