Project: 3D Craft -- Cameras
This page describes cameras and their use in Project: 3D
Craft. This section is broken into three parts, a discussion of
cameras, a discussion of the p3dc_CMRA
type, and then the APIs that take cameras as their first
parameter (the Camera API).
Definitions and types related to
Cameras
The p3dc_CMRA type is used to define all of
the properties of a virtual camera.
| Member |
Type |
Description |
| origin |
p3dc_PNT3 |
This is the location of the camera in the world. The
vector from it to the look-at point defined
below is the view's Z axis. |
| look |
p3dc_PNT3 |
This is the point in the world where the
camera is supposed to point. By default it is 0,0,0 |
| up |
p3dc_PNT3 |
This is a unit vector that defines "up" for
the camera. It is an error to have the look-at
vector and the up vector match. |
| twist |
p3dc_FLOAT |
This is defined is a rotation about the camera's Z
axis. It is currently defined as being defined to occur before
camera re-location. |
| far_p |
p3dc_FLOAT |
This value defines the "back" of the
viewing frustum. Anything beyond this point is clipped
out of existence. |
| near_p |
p3dc_FLOAT |
This is the distance from the camera origin to the
'near' plane. If the near plane is the screen this would
be 0. |
| fov |
p3dc_FLOAT |
This is the field of view for the camera. It must be
greater than 0 and less than 180 degrees. Attempting to
set it to values outside this range is undefined. |
| W2V |
p3dc_XFRM |
This transform will transform a point from world
co-ordinates into this camera's viewing co-ordinates. It
is affine and does no perspective projection. I use it
for models that are moving about in the world. |
| V2S |
p3dc_XFRM |
This is the "view-to-screen" transform and
contains the perspective projection of the transformed
world view on to the 2D screen view. |
| view_xfrm |
p3dc_XFRM |
This transform is the product of W2V*V2S and will
transform a point from the world, into the view space of
the camera, apply a perspective projection and make the
point ready for clipping. It is used extensively when
drawing the scene on the screen. |
| vp |
p3dc_VIEW |
This field is a view port that is used by the GAL
layer to convert from camera co-ordinates into screen
co-ordinates. (see below) |
The p3dc_VIEW type is used to define the
mapping between a camera and the screen. The camera realizes the
scene in ideal (i.e. -1.0, 1.0) co-ordinates and the view is used
to map those into screen co-ordinates.
| Member |
Type |
Description |
| scale_x |
p3dc_FLOAT |
Scaling factor to convert from -1.0 to
1.0 into screen co-ordinates. |
| scale_y |
p3dc_FLOAT |
Scaling factor for the vertical screen access to
convert from -1.0 to 1.0 in Y space. |
| center_x |
p3dc_FLOAT |
This represents the screen X co-ordinate of point
"0,0". |
| center_y |
p3dc_FLOAT |
This represents the screen Y co-ordinate for point
"0,0". |
In the "real" world, cameras focus light through
lenses on to either a piece of film or a light sensitive detector
of some kind (say a CCD). The result is that a 3-dimensional
scene is rendered on to the plane of the detector/film/whatever.
What certainly wasn't so clear to me was how to simulate that in
a computer program.
The p3dc_CMRA
data structure is one of the more important ones in the library.
This structure defines a "view" into the 3-D world that
projects on to a rectangular 2-D plane (the screen). The camera
structure has three main parts:
- The transformation from the world co-ordinate space into
the camera's view space;
- The transformation from the camera's view space to the
2-D projection plane (a.k.a. screen space);
- The scaling from idealized screen space into actual
screen space.
These components form the basis of a simple viewing system and
the camera API is all about manipulating these transforms to
simulate putting the camera at a particular point in space and
pointing it at something.
This viewing system is incomplete in that it is not as general
as the PHIGS system or others where the perspective reference
point (PRP) can be specified, instead, the PRP is always centered
in the view.
The camera system does however let you set a variety of
parameters to suit your needs. In particular it allows you to set
the "near" and "far" clipping planes, the
"twist" of the camera, its "up" vector, where
it is "looking", and its is "location." Each
of these parameters are represented in the structure by the
fields, near_p, far_p, twist, up,
look, and origin. The parameters are combined
to create the transforms necessary to render a particular view.
The result of all the camera calculations is a matrix, view_xfrm,
that is used to render the scene.
Once the camera is set up, you call the rendering API to draw the scene with
that camera's transforms and then display the resulting frame.
Step one in initializing a camera is figuring out how to
transform world co-ordinates such that the camera's origin is at
0,0,0 and the Z axis points straight away from the camera (into
the screen). This computation is done using the function p3dc_camera_xfrm.
This function does its work by working backward from what you
want, let me explain.
The p3dc_CMRA
structure contains the origin of the camera O
(I'm using upper case letters to indicate vectors. Vectors have
three scalar components x, y, z) and the point in space where the
camera is looking L.
Using these to co-ordinates in world space we can
compute the unit vector that points from O
to L by performing
the vector subtraction of L
and O and
normalizing the result like so:
F = | L - O |
The result, F,
is the z axis of the new view. (This vector is called F to distinguish it from
the world's z axis, the view's three basis vectors are Right, Up, and Forward which related to x,
y, and z in a standard
Cartesian system.) To compute R,
the view's x axis, we compute the cross product of the up
vector stored in the p3dc_CMRA
and the just computed F
vector and normalize it to be a unit vector. This can be written
as:
R = | up
x F |
At this point we have two of the final basis vectors (F and R). With these two
vectors we can compute the up vector, U,
by computing the cross product of F
and R and
normalizing the result like so:
U = | R x F |
After figuring out the desired U
vector we have the basis vectors for the view transform. (R, U, and F.)
Now the twist of the camera has to be factored into the
matrix. The twist of the camera is the rotation of the camera
about its own Z axis. This computation is done by multiplying
this view transform with another transform that rotates about the
F axis. This
results in a new set of basis vectors for the view which I call R', U'
and F'. Note that
there is one bit of cleverness going on here that isn't
immediately obvious. The camera transform is an inverse transform
which means it spins the world about as opposed to camera
spinning about. Since the matrix that is computed is both affine
and orthonormal the inverse of the matrix can be
computed by swapping the rows and columns. Thus where I would put
each vector into a column in a 'regular' matrix I put the
camera's view vectors into the resulting matrix in rows.
The final step is to place the camera origin in this new
space. That could be represented as:
        	| R'x R'y R'z |
     	P = 	| U'x U'y U'z | | Ox Oy Oz |
		| F'x F'y F'z |
The transformed origin, referred to above as P, is placed with
the view basis vectors into the 4 x 4 transformation matrix to
complete the world to view transformation as follows:
        	| R'x R'y R'z  Px |
     		| U'x U'y U'z Py |
		| F'x F'y F'z Pz |
 		| 0     0     0   1  |
The result of these computations is stored in the camera's W2V
transform. The W2V transformed is used by the
model code as well as part of the computation of the models
eventual model space to screen space transformation.
Now for something a bit different. Going from the view on to
the screen.
Going from view to screen is easy when you understand it, and
impossibly opaque when you don't. This is where you need to know
a bit about matrix math to understand exactly how the Perspective
Transformation actually works.
To start, lets explain how perspective works. When you look at
something light from all directions in front of you is converging
on your eyeball and then getting fed to your optic nerve. This
can be modeled as a "pin hole" camera. (Using a
pin-hole camera is preferable since there are no focal length and
focal depth issues associated with them). Things that are closer
obscure more of your vision than things that are farther away.
Thus the things farther away look smaller although your brain
auto-compensates and tells you they aren't really small at all.
The typical "newbie" way of achieving a perspective
view then is to divide the X and Y view co-ordinates by Z before
drawing them on the screen. The newbie technique works well and
is satisfactory for many game situations or times when control of
the view isn't critical.
I of course wanted to know exactly what it meant to
divide by Z and that lead me to reading several discussions on
the perspective transformation.
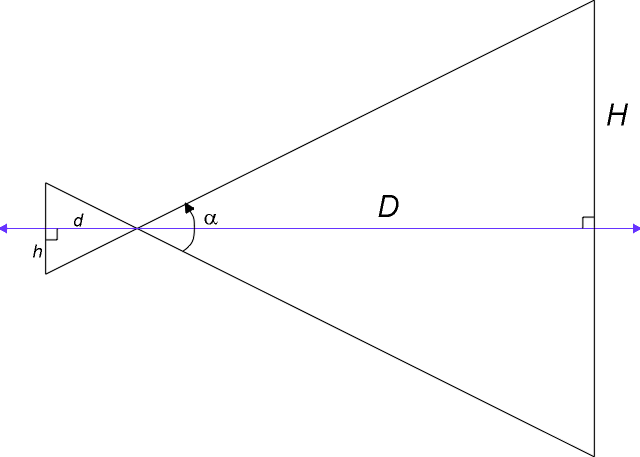
 The bottom line is that
you can think of a pin hole camera as defining two right
triangles, as shown in the image to the right (click on it for a
larger view). The value H is reflected through the
pin-hole to the value h behind it. Scaling of H to
h is defined by the ratio of H to D
which, from basic geometry of similar triangles, is identical to
the ratio of h to d. Further, the ratio is
related to the angle a which is called
the "field of view."
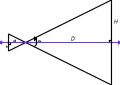
The bottom line is that
you can think of a pin hole camera as defining two right
triangles, as shown in the image to the right (click on it for a
larger view). The value H is reflected through the
pin-hole to the value h behind it. Scaling of H to
h is defined by the ratio of H to D
which, from basic geometry of similar triangles, is identical to
the ratio of h to d. Further, the ratio is
related to the angle a which is called
the "field of view."
So if you fix the field of view to be 90º then the angle in
the right triangle becomes 45º and the ratio between D
and H is 1.0. Thus simply dividing your X and Y
coordinate by Z is a simple way of implementing a perspective
transformation with a fixed field of view of 90º.
But what about other fields of view and why are they
important? Looking at the figure above you can probably see that
if the field of view is narrower then the distance at H will
be shorter. However, the screen remains the same size, so
displaying less of the view on the same size screen causes the
perception that the view is enlarged or zoomed.
Looking at documentation on 35MM camera lenses it became clear
that what defined a "tele-photo" lens is the distance
of its focal length. The focal length of the lens is just d
in the figure, and since h is fixed, changing the focal
length changes the field of view. Longer focal length, smaller
field of view, and larger zoom factor.
So to manage zooming in our simulated camera we need to do
something to the X and Y co-ordinates and that something is we
need to scale them. How much? By the same ratio d/h that
we used when figuring out the relationship of H to h.
To do this with a matrix is easy, we put the value d/h
into the [0,0] and [1,1] locations and that does the scaling for
us. But we aren't quite done. We are transforming from the view
to the screen and it will be rare that everything in the screen
will fit, so we will have to clip the scene to the screen
boundaries.
A lot of people get confused by clipping. I know I did, and
still do now and then, but I think I've got it nailed now. I
implement clipping using the Sutherland-Hodgman
clipping algorithm. Which is a very simple algorithm for walking
the vertices of a polygon, and inserting new vertices whenever
the current vertex and the next vertex are on different sides of
the clipping view. But what is the clipping view?
Imagine for a moment that you want to clip in 3-D and to
simplify things you make some assumptions which are:
- The camera is sitting at 0, 0, 0 and looking right down
the Z axis (which increases as it goes "away"
from the screen.)
- The view you are looking at is square.
- The farthest left edge of the view has the x co-ordinate
-1.0, the farthest rightmost edge has the co-ordinate
1.0.
- The topmost edge of the view has y co-ordinate 1.0 and
the lowermost edge has y co-ordinate -1.0.
- Everything in front of the camera has a z co-ordinate
greater than 0.0 and the farthest anything should be is
at z co-ordinate 1.0.
This is a pretty easy space to clip to right? Just check to
see if -1.0 < x < 1.0, and -1.0 < y <
1.0, and finally 0.0 < z < 1.0. If a vertex is
beyond one of those boundaries then you need to clip it because
the "view" is only what is inside the box.
As it turns out this is exactly what Sutherland-Hodgman does
and it does it by considering each polygon in the scene. The
algorithm starts with the second vertex (remember the minimum
polygon is a triangle which has three vertices!) and compares it
with the previous vertex. If both are outside the box, nothing
happens, if one is inside and one is outside the box then a new
vertex is created and "output" where the line segment
transitions to being "inside" the box, and if both are
inside then the current vertex is output and the next step is
done. When the last vertex is reached the algorithm "rolls
over" to the first vertex (remember it skipped it at the
start) and compares the first vertex to the last vertex
outputting it as appropriate. If the list of
"outputted" vertices is zero then the polygon is
outside the box completely, otherwise the new list is the clipped
version of the polygon.
Note that the algorithm operates on each plane intersection
test (x < -1.0 for example) iteratively. The result of running
this algorithm for all of the plane intersection tests (x >
-1.0, x < 1.0, y > -1.0, ... ) is a polygon that is
completely inside the box.
Yes, this takes up some computer time to do, however most
polygons do not need to be clipped and this step can be
skipped on those polygons that are completely visible. A very
fast visibility test is done with outcodes and is
described in the source.
"But how do we get to this 'ideal' world?" With a
transformation of course! Remember that that by scaling the x
and y values by the ratio of the field of view triangle
we converted from an arbitrary field of view to a 90 field of
view? Well in that view we can make a box by dividing x
and y by z!
So now Xs = x / z
and when z = x,
Xs will be 1.0 ! But that is a lot of divisions that we would
just as soon avoid so instead of comparing x
to 1.0 we can simply compare x to z!
So I make two changes to the V2S matrix, in addition to the x
and y scaling I add to [3,2] the value 1.0, to [3,3] the value
0.0, and to [2,2] and [2,3] the values 1 / (far_p - near_p)
and -near_p / (far_p - near_p) respectively. This makes
the matrix look like this:
 | d/h  0.0          0.0                 0.0        |
 | 0.0  d/h          0.0                 0.0        |
 |                   1.0              - near_p      |
 | 0.0  0.0    ----------------   ----------------- |
 |             (far_p - near_p)    (far_p - near_p) |
 | 0.0  0.0          1.0                 0.0        |
And when I multiply by this matrix there are a couple of
interesting effects. The fourth element 'w' in the resulting
vector R becomes Rw = Vx * 0.0 + Vy * 0.0 +
Vz * 1.0 + Vw * 0.0, or more simply the value of Vz
gets copied into Rw. And the value in Rz gets
computed as Rz = Vx * 0.0 + Vy * 0.0 + Vz /(far_p-near_p) +
(Vw * near_p) / (far_p - near_p) and since Vw is
always 1.0 that reduces (with a bit of algebra) to Rz = (Vz -
near_p)/(far_p - near_p). Which, if you were to map it out,
re-maps Rz to be a number that moves linearly between 0
when Vz = near_p and 1.0 when Vz = far_p. This
linearity is used to our advantage to get the maximum resolution
out of the 16 bit w-buffer available on the Voodoo style
hardware accelerator.
Finally, the view port may not be square, and as such the
ratio of the width to the height is not 1.0. To correct for a
non-square view port, the term in location [0,0] is multiplied by
the ratio of the width to the height to "squeeze" the
box along its width when doing clipping calculations.
After computing the world to view, and view to screen
transformations, the results are multiplied to create the final
composite transformation and stored in the structure member view_xfrm.
Additionally the structure VP which is of type p3dc_VIEW
contains the scaling factor for the screen x and screen y
co-ordinates. The rendering pipeline then works as follows:
- For each vertex in a drawable "primitive"
(line, polygon, etc) :
- The vertex is transformed using the transform in view_xfrm.
- The "outcode" is computed to determine
if that vertex is not visible.
- The "primitive" is clipped and then passed to
the hardware layer.
- The hardware layer computes screen co-ordinates as
follows:
- ScreenX = vertex->x / vertex->w *
view->scale_x + view->center_x;
- ScreenY = vertex->y / vertex->w *
view->scale_y + view->center_y;
- Depth1 = 1.0 / vertex->z * 65535.0
+ 1.0;
1. Note that the depth computation is pretty
specific to the 3Dfx hardware. The "one over w" or oow
value ranges from 1/1.0 to 1/65536 using this technique.
Once the hardware layer has the screen co-ordinates and the
depth it has all the information necessary to render the
primitive into the frame buffer. When the frame buffer is made
visible to the user, the user sees the 3-D world rendered from
the viewpoint of the "camera" in world space. Voila'
we're done!
These are the interfaces that are used to allocate, free, and
manipulate cameras.
p3dc_CMRA *p3dc_new_camera(
p3dc_FLOAT fov, p3dc_FLOAT x, y, z )
This function allocates a new camera from the heap and
initializes the camera's transforms based on the field of
view passed in as fov and the position in x, y, and
z. The look-at point is assumed to be (0,
0, 0) and the up direction of the camera is assumed
to be the same as the world's Y axis.
void p3dc_init_camera(p3dc_CMRA
*cam, p3dc_FLOAT fov, p3dc_FLOAT x, y, z )
This interface initializes (or re-initializes) a p3dc_CMRA
structure. The camera's look-at point is presumed to
be (0, 0, 0) and the up vector is presumed to be the world's
positive Y axis.
The parameters that control the field of view, clipping
boundaries, etc, can be set individually or by using the very
flexible p3dc_set_camera interface. Each of these
interfaces is defined as p3dc_set_camera_XXX where XXX
is the parameter of interest.
A couple of notes you should be aware of:
- Some of these function calls are simply #defines in
p3dc.h rather than actual function calls. The #defines
rewrite the call in terms of a call to p3dc_set_camera.
- When you call p3dc_set_camera with multiple
parameters it tries to apply them in order so that you
get the expected results. However some sets, such as the
"look" point will invalidate any previous
changes to the camera orientation.
int p3dc_set_camera(
p3dc_CMRA *camera, int parameter, ... , 0 )
This is the generic version of the camera parameter
setting code. There are several parameters that can be set,
they are identified by a constant and take at least one
parameter. Parameters are passed to the function call as
parameter/argument tuples. In all cases the argument is
currently a pointer but this may change with future
parameters. The constants and their parameters are:
| Parameter |
Argument |
Description |
| P3DC_CAMERA_ORIGIN |
p3dc_PNT3 *origin |
The x, y, and z components of origin
are used to define the new location of the camera in
world space. |
| P3DC_CAMERA_VIEW |
p3dc_XFRM *transform |
The contents of transform are copied
into the camera's W2V transform and the view
transform is recomputed. |
| P3DC_CAMERA_SCREEN |
p3dc_XFRM *transform |
The contents transform are copied into
the camera's V2S transform and the view transform is
recomputed. |
| P3DC_CAMERA_ROLL |
p3dc_FLOAT *angle |
A rotation of angle degrees is applied
to the camera's world to view transform about the
local Z axis. Note: roll is relative to the
current position, not the "up" vector. |
| P3DC_CAMERA_YAW |
p3dc_FLOAT *angle |
A rotation of angle degrees is applied
to the camera's world to view transform about the
local Y axis. Note: yaw angle is relative to the
current position. |
| P3DC_CAMERA_PITCH |
p3dc_FLOAT *angle |
A rotation of angle degrees is applied
to the camera's world to view transform about the
local X axis. Note: pitch angle is relative to
the current position. |
| P3DC_CAMERA_FOV |
p3dc_FLOAT *angle |
The camera's field of view is set to angle
degrees. This will force the V2S transform to be
recomputed from the camera's parameters. |
| P3DC_CAMERA_UP |
p3dc_PNT3 *up |
The camera's notion of "up" is set to
be equal to the up parameter. Cameras are
initialized with an up parameter of (0, 1, 0) (the
world Y axis). |
| P3DC_CAMERA_FAR |
p3dc_FLOAT *dist |
The camera's far clipping plane is set to dist.
Objects that are farther away than this distance will
not be rendered on the screen. Camera's initially
have a far clipping plane set to 2048.0 |
| P3DC_CAMERA_NEAR |
p3dc_FLOAT *dist |
The camera's near clipping plane is set to dist.
Objects that are closer than this are clipped. This
value must be greater than or equal to 1.0. |
| P3DC_CAMERA_TWIST |
p3dc_FLOAT *angle |
The cameras twist is set to angle.
Unlike roll above this is specified in degrees from
the camera's local Up vector. |
| P3DC_CAMERA_LOOK |
p3dc_PNT3 *target |
The camera is oriented to look at target
in world co-ordinates. |
| P3DC_CAMERA_DIR |
p3dc_PNT3 *normal |
The cameral is aligned the normal vector normal
in world space. |
Once all parameters and their arguments are
included, you must include a 0 to indicate the end
of the list. This is a source of bugs, sorry about that. As a
usage example, consider locating a camera at 10, 5, -5 and
pointing it at the point 5, 5, 5:
p3dc_CMRA *cam = p3dc_new_camera(...);
p3dc_PNT3 location, interest;
location.x = 10; location.y = 5; location.z = -5;
interest.x = 5; interest.y = 5; interest.z = 5;
p3dc_set_camera(cam, P3DC_CAMERA_ORIGIN, &location, P3DC_CAMERA_LOOK, &interest, 0);

...
In the above example the camera is located and pointed in
the same call to p3dc_set_camera.
While the above routine is technically all you need, sometimes
it is convenient to set the camera's parameters individually,
this also allows for some nicer syntax. These routines should all
call p3dc_set_camera or just be #defines to calls to p3dc_set_camera
however given the evolutionary nature of the code not all of
them are yet.
void p3dc_set_camera_fov(
p3dc_CMRA *cam, p3dc_FLOAT fov )
This function sets the field of view of the camera to be fov.
This has the same effect as a "zoom" lens in that
the narrower the field of view, the more magnified the view
appears. Note that this changes affects the V2S
transform but not the W2V transform in the camera
structure.
void p3dc_set_camera_target(
p3dc_CMRA *cam, p3dc_FLOAT x, y, z, p3dc_PNT3 *up, p3dc_FLOAT
twist)
This function is one of two orientation functions for
cameras. This one "targets" the camera at a point
in world space and sets its "up" orientation. To
point the camera at a model (for following it for example)
you might use
p3dc_target_camera(mycamera, x, y, z, &up_vector, 0);
Which would have the effect of targeting the camera at a
point (x, y, z) in world space, using up_vector as
its notion of up, and not twisted about the camera's view
vector at all. If the up parameter is NULL
then the world Y axis is presumed to represent the up
direction.
void p3dc_set_camera_origin(
p3dc_CMRA *cam, p3dc_FLOAT x, y, z)
This function positions the camera at the point (x, y, z)
in the world. Note that the camera will re-orient itself to
continue looking at its "look" point.
void p3dc_set_camera_dir(
p3dc_CMRA *cam, p3dc_PNT3 *dir, *up, p3dc_FLOAT twist )
This function is a general purpose camera orientation
routine. It takes a unit vector pointing in the same
direction that you want the camera to point, a unit vector
pointing in the direction of "up" (if this is NULL
then the Y axis is assumed to be pointing up) and a
"twist" value which defines how the camera is
rotated about its view axis. Note that twist and up are
related in that the camera is presumed to be at zero twist
when the camera's "up" vector is, as closely as
possible, aligned with the up vector. So an up vector of (0,
-1, 0) with a twist of 0 degrees, is equivalent to an up
vector of (0,1,0) with a twist of 180 degrees.
void p3dc_set_camera_roll(
p3dc_CMRA *cam, p3dc_FLOAT angle )
This function changes the camera's orientation along its
"look" vector (nominally the Z vector). Positive
angles roll the camera clockwise, and negative angles roll
the camera counter-clockwise. The roll angle is relative
to the current position and orientation of the camera. You
can re-zero the camera to zero roll by resetting its
"up" vector with p3dc_set_camera.
void p3dc_set_camera_pitch(
p3dc_CMRA *cam, p3dc_FLOAT angle )
This function changes the "pitch" of the camera.
Intuitively this causes the camera to "look up"
when the angle is positive, and to "look down" when
the angles is negative. The change is relative to
the current camera position so calling this function twice
with an angle of 5 degrees will cause the camera to end up
looking up by 10 degrees (twice 5 is 10, get it?)
void p3dc_set_camera_yaw(
p3dc_CMRA *cam, p3dc_FLOAT angle )
Can you guess what this one does? Ok this function turns
the camera "right" when the angle is positive and
"left" when the angle is negative. Again the change
is relative to the current camera position so if you started
out looking straight ahead and called this once with the
value of 10 and once with the value of -15 for angle
then the camera would end up oriented such that it was
pointed 5 degrees left of where it started out.
void p3dc_set_camera_window(
p3dc_CMRA *cam, int width, int height
)
This function sets the scaling of X and Y in the view
structure such that the resulting view rendered by the camera
will be width pixels wide by height pixels
high. Centered of course where the camera was centered on the
screen before.
void p3dc_set_camera_frame(
p3dc_CMRA *cam, int x, int y, int width, int height )
This function configures the camera's view so that the
lower left corner of the view is at [x, y] and the
camera view is width pixels wide by height
pixels tall. What is unclear to me is what exactly this means.
One of the areas I'm trying to figure out is the relationship
between camera parameters and perceived size. How do I create
an Ant's view of the world? A dog's? A person's ? Certainly
dog's eyes and people eyes are about the same size but not an
Ant's. And of course every thing is "bigger" but
does an ant sitting on my shoulder see the world as I do? I
don't think so. Lots to learn in this area.
void p3dc_set_camera_view(
p3dc_CMRA *cam, p3dc_XFRM *new_W2V )
I wrote this function originally to allow me to play
around with different ways of calculating the world to view
transformation. See the file cameratest.c
for usage. It simply copies the transform into the camera and
recalculates the view transform based on the camera's
existing view to screen transform.
void p3dc_set_camera_screen(
p3dc_CMRA *cam, p3dc_XFRM *new_V2S )
I wrote this function originally to allow me to play
around with different ways of calculating the view to screen
transformation. See the file perspective.c
for usage. It simply copies the transform into the camera and
recalculates the view transform based on the camera's
existing world to view transform.
void p3dc_set_camera_near(
p3dc_CMRA *cam, p3dc_FLOAT d )
This function sets the point where objects close to the
camera get clipped. Since our camera is a pin-hole camera
there is a singularity at 0 but it turns out that in reality
the number is nearly always 1.0 This is because it is easier
to think in whole numbers, however you can set this to be
smaller if you need to..
void p3dc_set_camera_far(
p3dc_CMRA *cam, p3dc_FLOAT MaxZ )
This function sets the farthest Z point I care about. More
importantly when I am rendering to the w buffer, values in Z
are scaled to go between 0 and this value. That helps prevent
clipping artifacts, and most of the time things farther away
than this aren't visible anyway so why bother drawing them.
 The bottom line is that
you can think of a pin hole camera as defining two right
triangles, as shown in the image to the right (click on it for a
larger view). The value H is reflected through the
pin-hole to the value h behind it. Scaling of H to
h is defined by the ratio of H to D
which, from basic geometry of similar triangles, is identical to
the ratio of h to d. Further, the ratio is
related to the angle a which is called
the "field of view."
The bottom line is that
you can think of a pin hole camera as defining two right
triangles, as shown in the image to the right (click on it for a
larger view). The value H is reflected through the
pin-hole to the value h behind it. Scaling of H to
h is defined by the ratio of H to D
which, from basic geometry of similar triangles, is identical to
the ratio of h to d. Further, the ratio is
related to the angle a which is called
the "field of view."