Building the Corners
Now that we have the transistors picked out, we look at implementing an H-bridge using them. Because these transistors are a complementary pair, the circuit using them is very symmetrical.
 The
upper right and upper left corners of the H-bridge are called "sources."
This name originates from their function which is to be a source of current
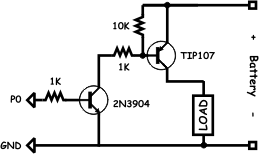
for the load (in our case the motor). Referring to the schematic on the
right, you can see that there is a 10K resistor between the base of the
TIP107 and the positive terminal of the battery. This is a pull-up resistor
that insures that the transistor is "off" (or not sourcing any current) when
the switch is open. The 1K resistor that is connected in series with the
switch is used to limit the current coming out of the base when the base is
grounded by the switch. So in this case when the switch is closed, the
emitter-base junction becomes forward biased and current flows "out" through
the base. If the battery is 12V and the voltage drop of the Base-Emitter
junction is .7V, then the current flow in the base will be -11.3mA (negative
because it is
flowing "out"). Given the Hfe specs for this transistor, this level of base
current will completely turn "on" this transistor allowing the load to
consume as much current as it needs.
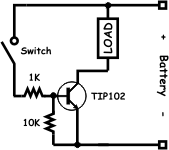
 Conversely,
the schematic on the left is called a "sink." Its name is derived from this
circuit's function which is to provide a place for current to go once it has
passed through the load.
The lower left and lower right corners of the H-bridge are implemented as sink circuits. In the sink circuit the 10K resistor connects the base of the transistor to ground, which forces the transistor off when the switch is open. When the switch is closed, current is injected into the base through the now forward biased base-emitter junction. Again the amount of current is nearly identical to the source configuration so an equal amount of current is allowed to flow through the load.
Of course if we have to throw switches to turn these transistors on it doesn't make for a very useful H-bridge. In order to drive this H-bridge from a microprocessor we need to put the microprocessor pins in control.
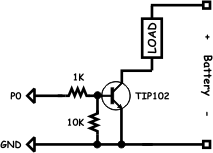
 In the sink circuit, the transistor stays
turned off if the base is grounded, it turns on when current flows through
the 1K resistor and into the base. A typical microprocessor's output pin can
generally put out either 3.3V or 5V as a logic "true" output. Given that we
need only approximately 5 mA to turn the transistor fully on, you could compute the
necessary base resistor by subtracting the base-emitter voltage drop (.7V)
from the logic high voltage (3.3 or 5) and then dividing by the desired base
current (5 mA) to get
the appropriate resistor (660 or 1K ohms respectively). The source circuit is
another problem entirely and an area I call "the high side problem."
 Turning
on the source is easily accomplished by grounding the 1K resistor, however
turning it off requires bringing the 1K resistor up to the motor
voltage. You could tri-state the output and let the 10K resistor bring it up to the motor voltage.
However, if you did, you're microprocessor
pin might be exposed to a voltage that is was not designed to handle. A
solution for this problem is to add another transistor to the high
side which is a sink circuit to turn on the source circuit!
In the schematic you can see that I added a 2N3904 NPN type transistor which replaces the switch in the original schematic. This works because the microprocessor only need turn on the 2N3904 (which is referenced to ground), then that pulls the base of the source transistor to ground through its 1K resistor which turns on the source transistor and current then flows into the load. But as you need to add two transistors anyway to control the two upper corners of the bridge, there is an even better way to go.
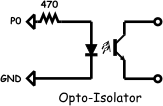
 The
picture on the left is the schematic representation of an opto-isolator. An
opto-isolator is an LED and a photo-transistor packaged into a single 4 lead
package. You can get four opto-isolators in a single IC
DIP using the NEC PS2504-4. When
current flows in the LED the photons it emits illuminate the base of the
photo-transistor. This causes the photo-transistor to turn on and begin
conducting current. The photo-transistor is completely electrically isolated
from the LED so the voltage on the phototransistor has nothing to do with
voltage on the LED. This isolation brings with it two benefits and one
drawback.
The major benefit is that the photo-transistor can used in place of the switches in our sink and source circuits. This means that the microprocessor sees four LEDs to light up, but what they really do is activate the circuits in the bridge. The second benefit is that the motor power supply with all of the switching noise is completely isolated from the power supply that is powering the microprocessor.
The drawback is that the opto-isolator doesn't switch on and off as nearly as fast as a regular transistor. In fact it can take 4 uS to turn this baby on. That means that simply turning it off and on as fast as possible results in a 125Khz, 50% duty cycle waveform. (4uS on, 4uS off). In practical terms, if you want equal PWM steps from 1% to 100%, then the minimum "off" or "on" time is one 4uS increment. The equal step constraint would limit you to a PWM period of 400uS, or 2,500 Hz. If you don't care about the edge conditions you could choose 1 uS as your increment, then given the minimum 4uS switch time, your duty cycle could be 0%, 4%-96%, and 100%. The gaps at the low end and high end represent the 4uS switching minimum. The benefit however is that your base period is now 100uS and your base frequency is 10Khz. In summary, a completely symmetric PWM control will be no faster than 2500 Hz. If the areas of very low duty cycle and very high duty cycle are un-interesting to your application, then the frequency can be increased.
The final thing we have to consider before we design the circuit is the nature of DC motors. A DC motor looks like a resistor and an inductor (coil) to the H-bridge. The resistor doesn't cause us much grief, but the inductor does. That is because inductors do not like being switched on and off. When the current through an inductor changes, the voltage across it goes up in proportion to inductance and the rate of change in the current. This is expressed in engineering texts as V = L(di/dt). Well switching off 6 amps of the current in 4 uS means the the voltage is something like L*(6/.000004) or L*1,500,000. Clearly you aren't going to see several million volts but you will see a spike in voltage when the inductor is switched.
I'll dive a bit more deeply into this phenomena in the analysis section but for now this means we need some diodes (called free wheeling diodes) to direct those voltage spikes to places where they can do no harm. Fortunately, the TIP107 and TIP102 have freewheeling diodes built into them, but if you decide to use transistors that don't have built in diodes the circuit in the next section provides for them.
Next: The Complete H-Bridge ...
| Transistor Selection | ||